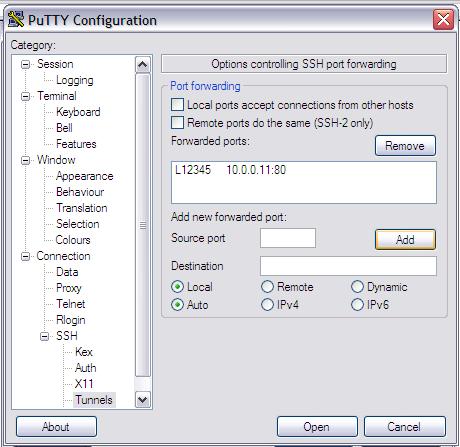
STYLISH SSH - PUTTY AND OPENSSH
 
Well, we know about SSH, the server program which allows encrypted communications in many formats. The problem is that most of us are stuck using MS-Windows, which has no standard SSH client program. In this page we will be going through using putty -and it's associated programs- to connect to an OpenSSH linux-based server. Lets broaden our minds.

Where Do I Get Putty?
First thing you need to have to use putty is putty (rather a zen statement that).  Point your browser to the download page, there you will find a number of programs - putty, plink, pscp, etc. While we will only be going through the use of one or two of this programs, I would greatly recommend getting all of them as each one of them is tremendously useful.

Putty and Public Keys
Double-clicking on putty will open up a window which is pretty self-explanatory. Enter a hostname or IP address, choose your protocol and port, and off you go. What I want to go through here is using public-key encryption certificates so that you do not need to enter a password upon login. To do this you need the puttygen.exe executable. Running this file opens a window which allows you to choose the type of key you want (I recommend the RSA for use by the SSH version 2 protocol), then you hit generate. When the key has been generated you will have a window rather similar to one shown below..


What you want to do now is to save the private key, this will save the private key in a .ppk file. It goes without saying that all the normal precautions associated with the usage and storage of private keys need to be followed. Next, you need to highlight and copy all the text in the box titled "Public key for pasting into OpenSSH Authorized_keys file:". Open up a SSH terminal session to the server you want to use the public-keys on, go to the user's .ssh directory, open up the authorized_keys2 (for SSH version 2), and paste the copied text into that file making sure that it no line breaks sneak into the text (in simple terms this means that all the text should be one long line).

Now you run putty again, this time you enter your hostname or IP address, choose the SSH protocol, and then go to the SSH Auth section in putty. Enter the location of the .ppk file -the one you created in the above process- as shown below;


Now when you go open, you should connect straight to the server without the need for a password after entering the username. You can save all of these session specific settings on the main putty window. If you have problems connecting check your permissions on the SSH server (explained in - Passwordless SSH) and you can also check in the SSH servers log files, generally in /var/log/secure.

Also if you want to connect totally automatically, without entering the username or the password, then follow the process we went through above, and enter the username used in the Connection Data section of putty, as shown below;


Putty Tunnels
Putty can also do tunnels (see SSH Tricks - Forwarding for an explanation),  we'll use our same saved session , except we will go the the SSH Tunnels section of putty and enter out tunnel data, as you can see below I am forwarding to my local port 12345 the web port (80) on the server 10.0.0.11;


These settings can also be saved as part of a saved session, so that the tunnel is automatically setup. Even better is the fact that you can have more than one tunnel being setup in a single session, this is the ideal way to setup a free small-scale VPN setup for people connecting remotely.

Final Words
As I said putty is a very very useful program, but don't forget about putty's cousins;
-plink - A command line based client. Very useful for running commands on a SSH server
-psftp - A command line based sftp client
-pscp - A command line based secure copy client.
And there are others, all of them deserve a prominent place in any administrator's box-o-tricks. As always have fun playing and learning.